Configuring Single-Sign-On for Lucidchart Enterprise with WSO2 Identity Server

Diagramming tools play an important role in the software development lifecycle for developers and students alike. Lucidchart is a platform that enables collaborative diagramming with intelligent visualization features that aids in the design process. Teams of an organization can work together in real-time using the Lucidchart cloud platform where they can comment, chat and co-author diagrams even while working remotely.
WSO2 Identity Server (WSO2 IS) is an open-source Identity and Access Management (IAM) solution that provides Single-Sign-On (SSO) capability for applications via standard protocols such as Oauth2/OpenID Connect, SAML, WS-Federation, etc.
You can enable SSO for Lucidchart with WSO2 IS, so that the users of your organization can experience a hassle-free, secure login to Lucidchart using their WSO2 IS credentials. The steps are simple to follow.
Prerequisites
Before you begin, please ensure that the following prerequisites are met.
You need to have,
- A Lucidchart Enterprise Account
- A WSO2 Identity Server Setup ( WSO2 Identity Server 5.11 has been used in the steps, but you can also use previous versions of WSO2 IS)
Configuring Lucidchart
- Log in to the Lucidchart Enterprise account as an administrator.
- Click on the Admin menu item from the left sidebar menu to access admin privileged options.

3. Select Identity Management from the Admin menu options.

4. Tick the checkbox to allow SAML authentication as a User Sign in option and save the changes.
Note: You can also select the default authentication mechanism for your organization’s users as SAML SSO instead of password from the Default Authentication dropdown.

5. Navigate back to the Admin menu and select App Integrations.

5. Select the SAML option from the General tab to initiate the SAML configuration of the application.
Note: You can see that the SAML option is now displayed as enabled.

5. Enter your domain name in the Lucidchart Sign in URL section and save the changes.
Note: You can also navigate to sign-in-options from this view and enable/disable SAML from the user sign-in options.

6. Scroll down and click the Download Metadata button to download the service provider metadata file to upload to WSO2 IS in order to create the SAML application.
Note: A metadata file in XML format will be downloaded when the button is clicked.

The Identity Provider (IdP) metadata file needs to be downloaded from WSO2 IS and uploaded in the Identity Providers section above to configure it as an IdP in Lucidchart.
We will take a look at how to download the metadata file from WSO2 IS in the next section.
7. You can also redirect your logout to WSO2 IS by providing a Logout Redirect URL in the Advanced Configurations.
Note: Please use the URL as follows. {{WSO2 IS base url}}/samlsso?slo=true

Configuring WSO2 Identity Server
- Sign in to the WSO2 IS Management Console.
2. From the Service Providers menu item in Identity section, select the Add option to register a new service provider.
3. Provide a name for the service provider (Ex: Lucidchart) and click the Register button.

4. From the service provider edit view, select SAML2 Web SSO Configuration from Inbound Authentication Configuration and click on Configure.

5. Select Metadata File Configuration and upload the metadata file downloaded from Lucidchart and click on upload.

6. Once uploaded, the Lucidchart configuration information will be loaded in to the service provider form including basic information, certificate information and SAML Web SSO configuration information.
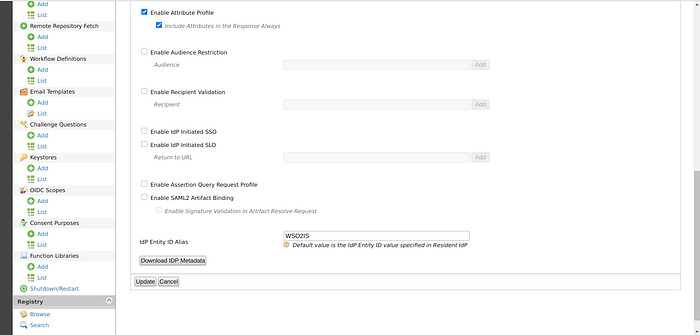
7. Edit the SAML Web SSO Configuration to enable response signing and attribute profile and click update.
Note: You can also configure to enable the Single logout option and provide the required request and response URLs from Lucidchart.

8. Scroll down to download the IdP metadata file to upload to Lucidchart with the WSO2 IS IdP configuration information.

9. Select Claim Configuration in the service provider edit view and configure it as follows.
Note: Make sure to use the same Service Provider Claim values as below.
- user.email
- user.lastname
- user.firstname

Final Configurations and Testing
- Go back to Lucidchart and upload the WSO2 IS metadata file.

2. The SAML connection can now be tested by clicking on the Test SAML Connection button or via using the URL in the Sign in URL field.
3. Use the Sign in URL above to access Lucidchart sign in for your organization.
Note: You can share this URL with the users in your organization for them to directly access Lucidchart with SSO using WSO2 IS.
This URL will direct you to the WSO2 IS login page as below from which the user can enter their WSO2 IS credentials to log in to Lucidchart.

4. When a user logs in to Lucidchart for the first time, they will be requested to consent to Lucidchart accessing the following claims.

5. Tick the boxes for the user claims and click continue to successfully log in to Lucidchart with WSO2 IS via SAML SSO.

